What You Need for a Heat Pump Dryer: A Practical Guide
Learn what you need for a heat pump dryer, including electrical requirements, space planning, condensation setup, tools, and maintenance. This step-by-step guide helps homeowners and pros install or upgrade with confidence.

To get a heat pump dryer up and running, you need a suitable power supply, a labeled installation space, the right venting/condensation setup, and basic tools. This guide covers electrical requirements, space planning, essential materials, and safety tips so you can install or upgrade confidently. We’ll note ideal clearances, typical energy considerations, and when to call a pro.
What you need for heat pump dryer: a quick orientation
Heat pump dryers represent a different approach to laundry care by recapturing heat inside a closed refrigerant loop. This design can deliver excellent drying results while using significantly less energy than traditional vented models. For homeowners, builders, and property managers, the key is understanding how the unit fits your space, electrical system, and drainage options. In this section we set the stage for practical decisions, including how to compare models and what to plan before buying. By thinking through your laundry layout,noise tolerance, and maintenance routine, you’ll avoid common pitfalls and maximize comfort and efficiency. According to Heatpump Smart, selecting a model that matches your space and energy needs yields meaningful savings when paired with proper installation and controls. Heatpump Smart analysis shows that a well-planned setup can substantially improve long-term energy performance. The goal here is clarity: identify your constraints, read the installation manual, and map out the steps before purchase to avoid surprises.
Electrical considerations and circuit readiness
Electrical readiness is foundational for any heat pump dryer installation. The typical requirement is a dedicated circuit sized for the appliance’s electrical draw, with proper grounding and overcurrent protection. Do not piggyback onto shared circuits, and never run a heavy appliance through an undersized outlet or extension cord. A licensed electrician should verify panel capacity, wire gauge, and safety clearances, especially if you are upgrading from an existing vented dryer. Local codes vary, but the principle remains: ensure clean power delivery, proper disconnects, and a reliable ground. This planning reduces the risk of nuisance tripping, overheating, or electrical shock during first use.
Space, placement, and condensation management
Where you place a heat pump dryer matters for performance and durability. Ensure a level, stable floor with adequate clearance for air intake and exhaust, even though most units are designed to recirculate heat internally. If your model uses a condensate drain, plan a route to a drain or condensate pump, keeping hoses secure and elevated as needed to prevent backflow. Avoid damp spaces or areas with high humidity that could encourage mold growth around the cabinet. Proximity to damp linens, cleaning supplies, and pets should also be considered to minimize wear and odors and to keep the space easy to clean.
Tools and materials you’ll need
Preparing for installation means gathering a practical toolkit and any model-specific parts. A basic hand tool set, level, measuring tape, flashlight, and voltage tester are essential. You may also need a drain hose, clamps, fittings, and sealant to secure drainage connections. Personal protective equipment such as gloves and safety glasses helps during handling and mounting. Always consult the appliance manual for model-specific requirements, and confirm if any additional parts—like a condensate pump or an approved connector kit—are included with your purchase.
Choosing the right heat pump dryer: key features to prioritize
Not all heat pump dryers perform the same. When evaluating models, prioritize energy efficiency and reliable drying performance. Look for moisture sensors that stop cycles when clothes are dry, and consider models with smart controls for scheduling and remote monitoring. Noise ratings matter in open-plan homes, so check decibel levels. Reliability and warranty length reduce long-term costs, while robust compressors and refrigerant loops contribute to longer lifespans. Also verify compatibility with your space: electrical outlet type, drainage options, and any condensation routing in tight spaces. With the right features, you’ll experience consistent results and lower energy bills.
Installation overview and rough timeline
A typical installation includes planning, electrical verification, drainage setup, appliance placement, connection, and a final test. Start by measuring space, choosing a model, and confirming that the electrical panel can handle the dryer. If a circuit upgrade is required, coordinate with a licensed electrician. Then set up the condensate drainage route, connect the unit, level it, and run a test cycle to verify heat distribution and moisture handling. Allocate a full day for the initial install, with additional time if plumbing or wiring changes are needed.
Maintenance and long-term care for heat pump dryers
Regular maintenance keeps performance high and energy use low. Clean the lint filter after every cycle, and inspect the condenser for lint buildup and fabric fibers that can impede airflow. If your model uses a condensate pump, test it monthly and verify the drain line for blockages. Keep the surrounding area clean and dry to prevent mold and odors. Periodically install firmware updates or check smart controls for optimal performance. Schedule professional service annually to catch refrigerant or compressor issues early and to prolong the unit’s life.
Safety reminders and common mistakes to avoid
Safety should never be an afterthought. Do not bypass safety features or use undersized power connections. Avoid placing the unit in cramped corners or areas with poor ventilation, as heat and moisture need space to dissipate. Do not overload cycles or block air intakes and exhausts. Keep flammable materials away and ensure cables and hoses are not kinked. Refrigerant handling requires licensed professionals; never attempt DIY repairs on the refrigerant system.
Final pre-use checklist before your first dry run
Before you power up for the first time, confirm the unit is level, the condensate drain is clear, and the power connection is secure. Double-check door seals and drainage hoses for leaks or kinks. Run a short test cycle with a small load to observe drying time, heat distribution, and condensate collection. Review the owner’s manual for warranty requirements and the recommended maintenance schedule. With attention to detail and safe practice, you’ll maximize comfort and savings from your heat pump dryer.
Tools & Materials
- Dedicated electrical circuit (per model requirements)(Ensure proper breaker size and grounding; may require a licensed electrician)
- Voltage tester / multimeter(For verifying circuits and safely powering down)
- Screwdriver set (Phillips and flathead)(For panel screws, mounting brackets)
- Level and measuring tape(To ensure the unit is level and properly aligned)
- Drain hose or condensate pump(For condensate drainage; route to drain or pump)
- Hose clamps, sealant or tape(For leak prevention and secure connections)
- Personal protective equipment (gloves, safety glasses, mask)(Safety first during install)
- Instruction manual for specific model(Always follow the manufacturer guidance)
- Optional: Drain line filter or condensate tray(Helpful for maintenance)
Steps
Estimated time: 4-6 hours
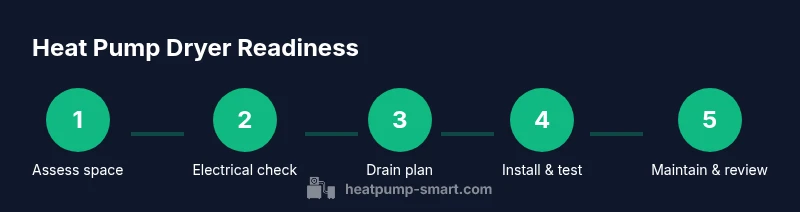
- 1
Assess space and electrical capacity
Evaluate the available space for the dryer, noting clearance to walls, doors, and cabinets. Check that the electrical panel has room for a dedicated circuit and can accommodate a dryer’s draw. If uncertain, consult a qualified electrician before selecting a model.
Tip: Document current circuits with photos and notes to simplify upgrades. - 2
Verify circuit availability or plan upgrades
Confirm whether the existing circuit can support a heat pump dryer or if a new dedicated circuit is needed. Do not share a circuit with other high-draw appliances. Have a licensed electrician size and install the correct disconnect and wiring.
Tip: Ask for a labeled breaker and a clear safety shutoff plan. - 3
Prepare installation location
Clear the area, ensure a level floor, and check that you can access the drainage and electrical connections. If the unit will be placed near other appliances, leave space for heat dissipation and servicing.
Tip: Mark drainage route early to avoid awkward twists in hoses later. - 4
Plan condensate drainage
Decide whether to drain condensate into a household drain or use a condensate pump. Ensure the path is gravity-friendly and free of sharp bends that could cause clogs or leaks.
Tip: Keep drainage hose loosely sloped to prevent standing water. - 5
Mount, level, and secure the unit
Place the dryer, verify levelness with the bubble level, and secure mounting brackets if required by the model. Uneven placement can cause excessive vibration and wear.
Tip: Use anti-vibration pads if the floor is hard or uneven. - 6
Connect power and drainage
Attach the electrical connection per the manual, ensuring all connections are tight and protected from moisture. Attach the drainage line securely and test for leaks before loading clothes.
Tip: Power down the circuit before connecting; never work on live circuits. - 7
Perform a dry run and check airflow
Power on and run a short cycle with a light load to observe heat distribution, airflow, and moisture collection. Listen for unusual noises or vibrations and address any wobble or obstruction.
Tip: Inspect the condenser and lint areas after the cycle. - 8
Set up maintenance plan
Create a simple maintenance schedule: after each use clean filters, inspect hoses monthly, and schedule annual professional service for refrigerant and compressor checks.
Tip: Keep a log of maintenance dates for warranty compliance. - 9
Document safety and warranty checks
Register the unit if needed and save installation documents, manuals, and contact details for service. Confirm warranty terms and any prerequisites for coverage related to installation.
Tip: Store manuals within reach of the laundry area.
Your Questions Answered
Do I need to vent a heat pump dryer?
Most heat pump dryers are ventless and condense moisture inside the unit. Some installation scenarios may offer vent options, but always follow the manufacturer’s guidance for your model.
Most heat pump dryers don’t vent outside; they condense moisture inside. Always follow the manual.
Can I install a heat pump dryer myself?
Basic setup and placement can be done by a homeowner, but electrical work and drainage connections often require a licensed professional. Follow local codes for safety.
You can do basic setup, but electrical and drainage work should be handled by a pro.
What space is needed for proper operation?
Provide a level surface with adequate clearance on all sides for airflow, service access, and drainage routing. Avoid cramped or damp locations and ensure easy access to hoses and filters.
Make sure the unit has space around it and easy access to the hoses and filters.
How often should I maintain a heat pump dryer?
Clean the lint filter after every cycle, inspect condensers periodically, and test drainage systems monthly. Schedule annual professional service for refrigerant checks and overall inspection.
Clean filters after every use and check drainage regularly.
What energy savings can I expect?
Heat pump dryers typically use less energy than traditional models, with savings depending on usage patterns and insulation. Pair with energy-conscious habits for best results.
They generally use less energy than standard dryers, especially with smart controls.
Watch Video
Top Takeaways
- Assess space and electrical needs before buying.
- Choose a model with moisture sensors and smart controls.
- Plan condensate drainage to avoid water damage.
- Use a dedicated circuit and professional help when upgrades are needed.
- Establish a routine maintenance schedule to maximize efficiency.