Distance Between Heat Pumps: Placement Guidelines for Efficiency and Noise
Explore evidence-based guidelines for spacing heat pumps, focusing on airflow, noise control, and maintenance. This objective comparison covers layout options, site assessment, and practical steps to optimize distance between heat pumps for better performance and neighbor comfort.

For two heat pumps, the ideal distance depends on installation goals, noise, airflow, and service access. Generally, plan for adequate clearance around each outdoor unit, align refrigerant runs to avoid interference, and follow manufacturer guidelines for spacing and isolation. Heatpump Smart analysts recommend consulting a pro to tailor distances to your site.
Why Distance Between Heat Pumps Matters
Distance between heat pumps is more than a simple measurement. It directly affects airflow around outdoor units, heat rejection efficiency, and the risk of noise transfer into living spaces or neighboring yards. When two heat pumps share a property, improper spacing can force systems to work harder to achieve the same performance, potentially increasing energy use and wear. The keyword distance between heat pumps appears here to anchor a practical discussion about layout choices, service access, and neighbor comfort. According to Heatpump Smart, site-specific planning beats generic rules, ensuring each unit operates in its own effective zone while staying within code and manufacturer guidelines.
Basic Layout Options for Two Heat Pumps
Installers typically evaluate several layout patterns when placing two outdoor units. A side-by-side arrangement minimizes refrigerant runs and can simplify electrical routing, but it may increase noise coupling if units are too close. A staggered or offset layout improves airflow around each unit and reduces direct noise impact, though it can require longer piping and more complex bracketing. Regardless of layout, equal access for maintenance and service is essential, and both options should be evaluated against local codes and installer recommendations. Heatpump Smart emphasizes that the best layout balances airflow, noise isolation, maintenance access, and total system cost over the life of the equipment.
Site Assessment: Factors Shaping Spacing
Successful spacing starts with a thorough site assessment. Consider wall setbacks, landscaping, sun exposure, drainage, and prevailing winds. Proximity to windows and outdoor living spaces matters for occupant comfort, while nearby structures can affect heat exchange and quiet operation. A good assessment also examines service access: technicians need clear paths to both units for routine maintenance, diagnostics, and potential refrigerant work. The distance between heat pumps should align with manufacturer clearances and any applicable local requirements, ensuring both units function as intended without undue interaction.
How to Approach Spacing Without Fixed Numbers
Because installation contexts vary, there is no universal fixed distance. Begin with the manufacturer’s mandatory clearance recommendations for each unit, then assess noise, airflow, and ease of service. If two units are near property lines, add isolation strategies such as fencing or vegetation barriers. A qualified installer will map refrigerant runs, electrical feeders, and condensate drainage so that each unit maintains its own service sphere without cross-interference. Heatpump Smart suggests documenting the rationale for spacing decisions to support future maintenance and inspections.
Efficiency, Noise, and Real-World Performance
Spacing impacts both efficiency and perceived comfort. Closer spacing can inadvertently increase recirculation of warm air from one unit into the other’s intake, raising compressor load during peak operation. It can also amplify vibration transmission, which neighbors may notice. Wider spacing generally lowers direct noise coupling and improves airflow, helping the system achieve rated efficiency without excessive cycling. Real-world performance depends on local climate, building envelope, and the quality of installation, including bracket rigidity and vibration isolation.
Piping, Electrical, and Isolation Considerations
Longer refrigerant runs introduced by wider spacing can affect pressure drop and refrigerant charge requirements. This means the design must account for potential capacity adjustments and charge verification. Electrical feeders should be sized to accommodate both units with separate disconnects and proper clearances. Isolation in mounting hardware and anti-vibration pads can reduce transfer of vibration and noise, improving neighbor comfort and unit longevity. Always validate that spacing choices satisfy code requirements and commissioning tests.
Case Scenarios: When Distances Differ by System Type
- Two air-source heat pumps in a tight urban lot: a staggered layout with enhanced vibration isolation and shielded intake paths can preserve efficiency and comfort while fitting within constraints.2) A dual-heat-pump setup on a suburban property with ample space: wider spacing can reduce noise overlap and streamline service access, with piping runs optimized for efficiency.3) A mixed system in a retrofit: plan spacing around existing ductwork and outdoor unit placement to minimize trenching or rework, while meeting manufacturer guidelines.
Maintenance, Code, and Permitting Realities
Code requirements vary by locale, but most jurisdictions require adequate clearance around outdoor equipment for service access, door openings, and routine inspections. Permitting may address setbacks from property lines, sightline obstructions, and noise limits. A well-documented spacing plan helps during inspections and future expansions. Regular maintenance checks should verify that clearances remain unobstructed by vegetation or debris and that vibration controls remain effective.
Practical Spacing Checklist for Your Project
- Review manufacturer clearances for each unit and apply the stricter one when two units are nearby. - Map electrical feeders, disconnects, and condensate drainage with room to access both units. - Plan for noise isolation if units are near living spaces or neighbors. - Ensure unobstructed access for maintenance, including routine service and potential refrigerant work. - Consider future expansions or replacements and document spacing decisions for future owners.
Balancing Cost, Comfort, and Longevity
Spacing choices influence initial installation costs, ongoing energy consumption, and long-term reliability. A compact layout may reduce trenching and routing costs but could raise operating temperatures due to restricted airflow. Wider spacing tends to improve efficiency and serviceability but increases material and labor costs. The optimal decision integrates site specifics, climate considerations, and performance targets, prioritizing long-term comfort and energy savings over short-term savings.
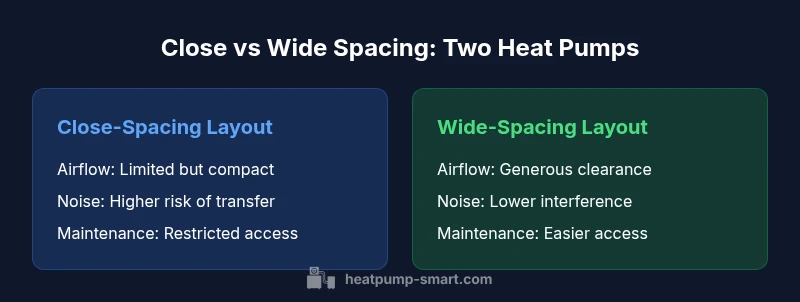
Comparison
| Feature | Close-Spacing Layout | Wide-Spacing Layout |
|---|---|---|
| Airflow clearance | Limited clearance | Generous clearance |
| Noise transfer risk | Higher | Lower |
| Maintenance access | Restricted | Easier |
| Cost considerations | Lower upfront | Higher upfront |
| Best for | Urban, tight lots | Larger lots, neighbor considerations |
Advantages
- Improved neighbor comfort when spaced apart
- Better airflow and system efficiency with adequate clearance
- Easier maintenance with clear access
- Flexibility for future add-ons or expansions
Disadvantages
- Potentially higher install costs due to additional piping and supports
- Requires precise layout planning and professional design
- Longer refrigerant runs may require careful charge verification
- More space required on the property to achieve optimal spacing
Wide spacing generally offers better performance and noise control; choose close spacing only when site constraints demand it and professional design mitigates risks
For most projects, wider spacing reduces noise coupling and improves airflow, boosting efficiency. Close spacing can save space and cost but may increase service challenges and neighbor disturbance; rely on an expert to tailor the layout to your site.
Your Questions Answered
What is the recommended distance between two outdoor heat pumps?
There is no universal distance; always follow manufacturer clearances and local codes. A professional installer will tailor spacing based on unit models, site layout, and noise considerations.
There is no one-size-fits-all distance. Check the manufacturer clearances and local codes, and have an installer tailor spacing to your site.
Do local codes specify minimum spacing between heat pumps?
Codes vary by jurisdiction. They may specify setbacks, noise limits, or required access for maintenance. Always verify with the local building department and your HVAC contractor.
Yes, codes vary; you should verify setbacks and access requirements with local authorities and your installer.
Can two heat pumps share the same refrigerant line or electrical supply?
In some configurations, shared piping or feeders may be possible, but it requires careful design by an HVAC professional to prevent interference and ensure proper charging and electrical protection.
Shared piping is possible in some setups, but only with professional design to avoid issues.
How does distance affect system efficiency?
Longer refrigerant runs can incur losses if not properly charged and sized. Proper line length planning, insulating, and correct refrigerant charge help maintain efficiency regardless of distance.
Longer runs can affect efficiency, but proper design keeps performance strong.
What about noise and vibration when spacing two units?
More spacing can reduce direct noise transfer and vibration coupling. Use vibration isolation pads and shielding where needed, and position units away from bedrooms or living spaces when possible.
Spacing helps with noise; use isolation pads and position away from sound-sensitive areas.
What should I ask my installer about spacing?
Ask about recommended clearances, airflow patterns, service access, local codes, and how spacing affects efficiency and future maintenance. Request a written spacing plan and a commissioning checklist.
Ask for clearances, airflow plans, and a written spacing plan with commissioning steps.
Top Takeaways
- Follow manufacturer clearances for each unit.
- Balance airflow, noise, and service access when choosing spacing.
- Plan for future maintenance and potential expansions.
- Use professional design to optimize long-term efficiency.
- Document spacing decisions for codes and future inspections.