Hayward Heat Pump Repair: A Complete How-To Guide
A complete how-to for diagnosing and repairing Hayward pool heat pumps. Learn safety steps, DIY fixes, when to call a pro, and maintenance practices to prevent future breakdowns.

Learn how to diagnose and perform safe, basic Hayward heat pump repairs for pool heating. This guide covers common symptoms, essential safety steps, DIY fixes you can try, and when to call a licensed technician for refrigerant or electrical work. Includes maintenance strategies to prevent future problems in all climates.
How Hayward pool heat pumps work and why repair matters
Pool heat pumps from Hayward operate by drawing ambient air over a refrigerant coil, then compressing the vapor to raise its temperature before transferring heat to the pool water. The basic cycle relies on an evaporator, compressor, condenser, and a fan that moves air across the coil. In warm weather, the unit can heat efficiently; in colder or dusty conditions, performance can decline. Regular Hayward heat pump repair and maintenance help maintain peak efficiency, reduce energy use, and extend the unit’s life. According to Heatpump Smart, routine upkeep is crucial for reliable Hayward heat pump repair outcomes. Key components to watch include the air filter, condenser coils, fan motor, electrical connections, and the control board. When any element wears or becomes dirty, the system may run longer to reach the desired temperature or fail to heat at all. In this section, we’ll outline common symptoms and how they relate to specific parts, so you know where to start your inspection.
Common failure points in Hayward heat pumps
Hayward pool heat pumps share a similar set of failure points as other air-source heat pumps. The most frequent issues involve airflow restrictions, electrical faults, and refrigerant system concerns. A clogged or dirty air filter reduces airflow and makes the unit work harder, increasing wear on the fan and compressor. Dirty condenser coils reduce heat exchange efficiency, raising running time and energy costs. Faulty capacitors or relays can prevent the compressor or fan from starting, while damaged wiring can cause intermittent operation or tripping breakers. Sensor failures or control board faults can cause incorrect temperature readings or lockouts. Finally, refrigerant leaks — though less common in newer models — require prompt professional attention, as handling refrigerants is regulated and hazardous.
Safety and prep before you begin
Safety is non-negotiable when working with pool heat pumps. Always power down the unit at the breaker and use a lockout/tagout procedure to prevent accidental restarting. Verify absence of voltage with a non-contact tester before touching any wires or electrical components. Wear safety gloves and eye protection, and keep the area dry to reduce shock risk. If the unit is mounted on a rooftop or in a cramped cabinet, use a stable ladder or platform and avoid placing yourself in awkward positions. Familiarize yourself with the Hayward model’s manual and identify exposed refrigerant lines before starting inspections. Remember: some tasks, especially those involving refrigerant or the electrical control board, require licensed professionals.
Diagnostics you can perform quickly
Begin with a visual inspection: look for loose wiring, corrosion, and signs of overheating near the electrical panel and wiring harnesses. Check the air filter and ensure unobstructed airflow across the condenser. Review any error codes on the control board or diagnostics panel and consult the manual for code meanings. Listen for unusual noises such as grinding or squealing from the fan or compressor, which can indicate bearing wear or a failing motor. If the pool isn’t reaching set temperatures, note the outdoor temperature and recent usage patterns to determine if the unit is simply under strain or if a component is failing. If you’re unsure, prioritize non-destructive checks and contact a qualified technician for next steps.
DIY fixes you can safely attempt
First, replace or clean the air filter to restore proper airflow. Clean condenser coils with a soft brush or compressed air, taking care not to bend fins. Ensure the fan blade spins freely and isn’t contacting housing. Tighten loose electrical connections and replace blown fuses. For non-technical issues, reset the breaker and clear any simple fault indicators after inspecting components. Do not attempt to repair refrigerant leaks or replace the refrigerant charge yourself; this requires licensed service. Keep a maintenance log of all simple fixes and observations for future visits.
When to call a pro for Hayward heat pump repair
If you notice refrigerant signs (oil around connections, hissing sounds, or obvious leaks), persistent failure of the compressor or fan even after cleaning and tightening, or an error code that you cannot resolve with the manual, contact a licensed HVAC technician. Electrical work beyond basic checks, control board faults, and all refrigerant handling demand professional expertise and certification. A pro can perform a refrigerant integrity check, accurate pressure measurements, leak detection, and system recharging if needed, all in compliance with local regulations. Additionally, if the unit is under warranty, professional service from an authorized technician may be required to preserve coverage.
Maintenance to prevent future breakdowns
Implement a fall and spring maintenance routine: clean or replace air filters, inspect electrical connections, and schedule a professional coil cleaning once a year or as needed. Keep the outdoor unit clear of debris and ensure adequate clearance for airflow. Regularly monitor pool temperature and run times to avoid overworking the system. Use the appropriate thermostat settings and ensure freeze protection if you live in a cold climate. Document any unusual behavior so you can spot trends over time.
Cost considerations and warranty notes
Maintenance and repair costs vary by region and the extent of work required. Basic diagnostics and non-intrusive maintenance tend to be less expensive than component replacements or refrigerant work. Check your Hayward unit’s warranty terms; some components may be covered, while labor may be excluded unless performed by an authorized technician. If a fault recurs soon after a repair, discuss a comprehensive service plan with your technician to prevent repeated trips. Remember that regular professional inspections can help identify issues early, potentially saving money in the long run.
Tools & Materials
- Non-contact voltage tester(Confirm de-energized before touching wiring)
- Digital multimeter(Check voltage, continuity, and resistance on control boards)
- Screwdriver set (Phillips and flat-head)(Panel screws, coil covers, and wiring terminals)
- Nut driver set(Cabinet fasteners and terminal blocks)
- Torx driver set(Some Hayward models use Torx screws)
- Spare capacitor (matching rating)(If your tests indicate a weak start or intermittent operation)
- Cleaning brushes and compressed air(Clean coils and vents without bending fins)
- Safety gloves and eye protection(Protect hands and eyes during contact with sharp edges)
Steps
Estimated time: 90-120 minutes
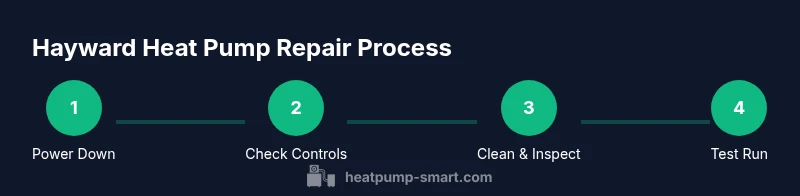
- 1
Power down and secure the unit
Shut off the electrical breaker feeding the heat pump and apply a lockout/tagout if available. Use a non-contact tester to verify the absence of voltage before touching any wiring or panel components. This step protects you from electric shock and ensures a safe working environment.
Tip: Always assume wires are live until proven otherwise. - 2
Inspect and clean the air filter
Remove the filter and inspect for dirt or blockages. Clean reusable filters with water and mild detergent, or replace if damaged. A clean filter improves airflow and heat transfer, reducing run time and energy use.
Tip: Clean or replace every 1-3 months during peak season. - 3
Check condenser coils and fan
Visually inspect coils for dirt and debris and clean gently with a soft brush or compressed air. Spin the fan by hand to confirm it moves freely without grinding or rubbing. Replace damaged fan blades and ensure the fan housing isn’t obstructed.
Tip: Avoid bending fins; use a coil comb if available. - 4
Inspect electrical connections
Tighten loose terminals and inspect for corrosion. Look for signs of overheating near the contactors and wiring harnesses. Replace blown fuses or faulty contactors as needed, following manufacturer guidelines.
Tip: Document any loose connections with photos for reference. - 5
Check refrigerant signs with a professional mindset
Look for obvious oil leaks around refrigerant lines or connections and listen for hissing sounds. Do not attempt to recover or recharge refrigerant yourself; only a licensed technician should handle refrigerant charges and repairs.
Tip: If you suspect a leak, schedule a diagnostic with a pro immediately. - 6
Review control board and error codes
Note any fault codes displayed on the control panel. Consult the Hayward manual or Heatpump Smart resources to interpret codes. If codes persist after a reset, do not bypass the fault—seek professional help.
Tip: Take a photo of the code to share with the technician. - 7
Test run after reassembly
Restore power and run the unit through a heating cycle for 15–20 minutes. Listen for unusual noises and verify pool water temperature changes. Stop the test if you detect overheating, leaks, or electrical smells.
Tip: Keep a log of observed performance during the test. - 8
Decide on repair vs replacement
If major components (compressor, coil, or refrigerant system) fail or replacement cost approaches a new unit, weigh long-term energy savings, warranty terms, and downtime. A pro can help calculate the cost-effectiveness of repair versus replacement.
Tip: Ask for a written estimate and warranty terms for any repair.
Your Questions Answered
What are common signs that a Hayward pool heat pump needs repair?
Unusual noises, reduced heating, water not reaching set temperature, ice on lines, or error codes on the control panel indicate a potential repair. Start with basic diagnostics like filters and airflow, then check for obvious electrical issues.
Look for odd noises, poor heating, or error codes. Start with simple checks and contact a pro if issues persist.
Can I diagnose hayward heat pump repair myself?
You can perform basic checks such as verifying power, cleaning filters, and inspecting for loose wiring. Refrigerant leaks and compressor problems require licensed professionals.
Basic checks are fine, but refrigerant and compressor issues need a pro.
Is it safe to perform DIY repairs on pool heat pumps?
Only perform non-invasive maintenance like cleaning filters and coils. Do not open refrigerant lines or service electrical components beyond basic checks.
Do not handle refrigerants or internal electrical work yourself.
How much does hayward heat pump repair typically cost?
Repair costs vary by region and parts needed. Simple diagnostics and filter changes are cheaper, while major component replacements or refrigerant work can be significantly more.
Costs vary; minor maintenance is cheaper, major repairs can be pricier.
How long does Hayward heat pump repair take?
A typical diagnostic and minor fixes can take a few hours, while refrigerant or major component work may require a dedicated service visit over multiple days including scheduling.
Most fixes are completed in a few hours, with bigger jobs scheduled after assessment.
What maintenance helps prevent future Hayward heat pump failures?
Regularly clean or replace filters, keep coils clear, check electrical connections, and schedule annual professional service to assess refrigerant and controls.
Stay on top of filters, coils, and yearly professional service.
Watch Video
Top Takeaways
- Prioritize safety before any inspection.
- Perform basic DIY checks: filter, airflow, and controls.
- Know when to call a licensed technician for refrigerant or electrical work.
- Regular maintenance prevents most common failures.
- Document issues and keep a maintenance log for future visits.