What Causes a Heat Pump Not to Come On? Troubleshooting Guide
Urgent, practical guide to diagnose why your heat pump won't start and fix common issues fast. Learn power checks, thermostat settings, safety switches, ice buildup, and when to call a pro for reliable heat and comfort.

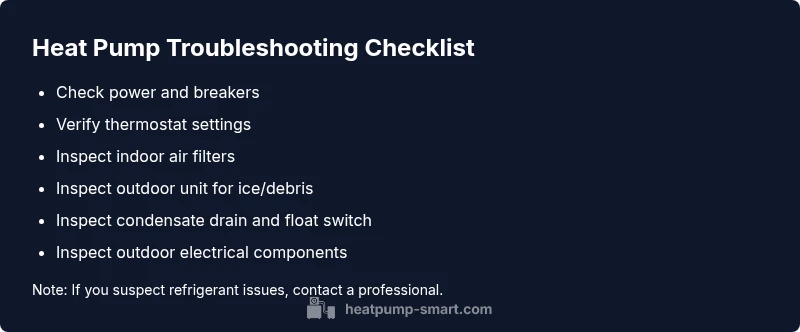
Most no-start heat pump issues start with power, thermostat, or safety controls. Begin by confirming the unit has power (check breakers and fuses), ensure the thermostat is set to heat (not off) and communicates with the system, and inspect for a frozen outdoor unit or a tripped float switch. If these fixes don’t help, contact a licensed pro promptly.
Why a Heat Pump Might Not Come On
According to Heatpump Smart, most heat pump no-start scenarios are caused by external factors you can safely inspect before calling a technician. The symptoms are often predictable: the system stays idle even though the thermostat calls for heat, the display on the indoor unit is dark, or you hear a subtle click without motor start. By thinking through power, controls, and safety features, homeowners can quickly rule out common culprits. This guidance focuses on practical, safe checks you can perform, plus when it’s time to bring in a professional. The goal is to restore reliable operation and prevent outages through good habits, not risky experimentation. Remember: some issues involve dangerous voltages or refrigerant handling, so never push past safety limits.
Step 1: Verify Power and Breakers
Power is the first line of defense. A heat pump won’t start if it loses electrical supply or if a breaker has tripped. Inspect both the main service panel and the disconnect for the outdoor unit. Reset any tripped breakers fully to the OFF position, then back to ON. If there is a replaceable fuse, swap it only with the same amperage rating. If you notice buzzing, a burning smell, or melted insulation, stop and call a professional—the risk of fire or electric shock is real. After power is restored, test the thermostat to see if the system engages.
Step 2: Check Thermostat Settings and Communication
A misconfigured thermostat is a very common cause of no-start. Verify the thermostat is set to HEAT, not OFF or a standby mode, and confirm the desired target temperature is above room temperature. Many thermostats also require a running communication link with the outdoor unit; if the display shows fault codes, consult the user manual or the Heatpump Smart guide for code meanings. If you recently replaced or upgraded the thermostat, ensure the wiring matches the original schematic and that the C-wire is connected for a stable 24V power supply.
Step 3: Inspect Air Filters and Indoor Sensors
Clogged filters and obstructed return air can trigger safety protections that prevent a heat pump from starting. Replace disposable or dirty filters, and clean any reusable filters according to manufacturer instructions. Check indoor sensors and the air handler for obstructions or misalignment. A blocked return path or a stray object can mislead the system into thinking indoor conditions aren’t suitable for operation. After addressing airflow, perform a system reset and re-test the start sequence.
Step 4: Outdoor Unit Ice, Debris, and Clearance
A common no-start cause is ice buildup on the outdoor condenser or debris that blocks airflow. Inspect the outdoor unit for ice, snow, leaves, or dirt. If ice is present, turn the unit off and let it thaw naturally if safe to do so, then restart. Clear debris and ensure several feet of clearance around all sides to allow adequate airflow. Persistent icing may indicate a defrost issue or refrigerant problem that requires service. Do not chip ice aggressively, as this can damage coils.
Step 5: Float Switch, Condensate Drain, and Safety Interlocks
Many outdoor units rely on a condensate overflow float switch. If the drain is blocked or the pan is full, the system may lock out to prevent water damage. Inspect the condensate drain line for clogs and verify the float switch is in the closed position. Clear any obstruction with gentle cleaning and ensure the line runs freely to a proper drain. Humid climates increase the likelihood of float-related no-starts, so this check is worth your time.
Step 6: Electrical Components and Safety Precautions
If power and control circuits seem fine, the issue may lie in the electrical components at the outdoor unit: contactors, capacitors, fuses, and wiring can degrade and fail to energize the compressor. Only handle high-voltage parts if you have proper training and equipment. A professional should test electrical continuity and refrigerant control circuits. Basic visual checks (loose wires, burnt connectors) can help, but avoid probing live circuits. Safety comes first.
Step 7: Refrigerant and System Charging (When to Involve a Pro)
Low refrigerant or a leak can prevent the heat pump from starting or running properly. Refrigerant work requires licensed HVAC technicians, tools, and compliance with environmental regulations. If you suspect a refrigerant issue—unusual frost, oily residue around lines, or a drop in system performance—do not attempt a DIY charge. A proper diagnosis includes leak detection, pressure testing, and correct refrigerant recovery and charging.
Step 8: Common Mistakes and Quick Prevention Tips
Avoid bypassing safety devices, using incorrect parts, or ignoring small fault codes. Prevent future no-starts with a simple maintenance routine: replace air filters on schedule, keep the outdoor unit clean, measure and log thermostat codes, and schedule annual professional servicing. A proactive approach reduces emergency calls and extends equipment life. Keeping a fault-code log helps technicians diagnose faster if a problem recurs.
Step 9: DIY vs Professional: When to Call a Pro
Some no-start conditions are safe to address yourself, but several scenarios demand a licensed technician: refrigerant leaks, compressor or capacitor failures, persistent tripping after resets, or any signs of electrical damage. If you are unsure about a test, or if tools and training are not available, contact a pro. A qualified technician will diagnose, repair, test the system thoroughly, and verify safe operation before leaving the site.
Steps
Estimated time: 60-90 minutes
- 1
Confirm power to the system
Check the main panel and outdoor disconnect. Reset any tripped breakers and ensure power is available to the outdoor and indoor units. If power is restored but the unit still won’t start, move to the next step.
Tip: Always start with power; it’s the easiest fix and most common. - 2
Set thermostat to HEAT and verify communication
Ensure the thermostat is in HEAT mode with a setpoint above room temperature. Look for fault codes and re-pair if you recently swapped thermostats. If codes appear, document and consult the manual.
Tip: If you changed batteries or installed a new thermostat, re-run the pairing process. - 3
Check indoor airflow and sensors
Replace dirty filters, clear the return air path, and inspect indoor sensors for proper seating. Poor airflow can trigger safety shutoffs that prevent start.
Tip: A quick reset after filter change helps confirm the system self-check. - 4
Inspect the outdoor unit for ice or obstruction
Look for ice on coils, leaves, or snow around the unit. Clear obstructions and safely remove debris. If ice persists, delay operation and phone a pro for a defrost or refrigerant check.
Tip: Never strike coils with tools; allow natural thaw if ice forms. - 5
Check condensate drain and float switches
Inspect the drain line for clogs and verify the float switch is closed. A full drain pan can trigger a no-start to prevent water damage.
Tip: Clear clogs gently; avoid chemical cleaners that could enter the refrigerant path. - 6
Assess outdoor electrical components
Inspect contactors, fuses, and wiring for signs of wear or arcing. If you see damage or smell burning, stop and call a pro.
Tip: Do not touch live components; use a multimeter only if trained. - 7
Consider refrigerant issues
Low refrigerant or leaks won’t improve with a reset. Refrigerant work requires licensed technicians and proper equipment.
Tip: Avoid attempting to top off refrigerant yourself. - 8
Decide between DIY vs professional
If basic checks fail or you encounter refrigerant, electrical, or compressor concerns, hire a pro. A proper diagnostic ensures safe, lasting operation.
Tip: Keep a log of fault codes and steps tried for the technician.
Diagnosis: Heat pump won't come on
Possible Causes
- highPower supply issues (tripped breaker, blown fuse, disconnected wiring)
- highThermostat configuration or communication failure
- mediumOutdoor unit blocked by ice/debris or safety switch triggered
- lowIndoor air handling issues (furnace relay, blower failing)
Fixes
- easyReset breakers/fuses and restore power to both indoor and outdoor units
- easyVerify thermostat settings, recalibrate, and re-pair if needed
- easyClear ice, remove debris, and ensure proper clearance around outdoor unit
- easyInspect safety switches and condensate float; clear blockages
- hardIf refrigerant is low or compressor failure suspected, call a professional
Your Questions Answered
What causes a heat pump not to come on?
The most common causes are power supply problems, thermostat misconfiguration, outdoor unit ice or obstruction, safety switch triggers, and indoor control issues. Systematic checks usually identify the culprit quickly.
Common causes include power and thermostat issues, ice around the outdoor unit, or safety interlocks—check these first.
Why is my thermostat display blank even when power is on?
A blank display often means power loss to the thermostat or a dead battery. Check the circuit, replace batteries if applicable, and ensure the thermostat is properly wired and paired with the system.
A blank display usually means the thermostat isn’t powered or wired correctly. Check power and batteries first.
Can a frozen outdoor unit stop a heat pump from starting?
Yes. Ice can trigger safety shutoffs that prevent startup. Allow it to thaw safely, remove ice, and address underlying causes like airflow or refrigerant issues if ice recurs.
Yes, ice buildup can stop the unit from starting. Let it thaw and check for airflow problems.
When should I call a technician?
Call a technician if basic power and thermostat checks don’t restore operation, if you hear buzzing or burning smells, or if you suspect refrigerant leaks or electrical damage.
If basic checks don’t fix it or you hear unusual noises or smells, call a technician.
Is there a safe reset procedure for heat pumps?
A safe reset is turning the power off at the breaker or outdoor disconnect for about 60 seconds, then restoring power and testing. If issues persist, avoid repeated resets and seek professional help.
Yes, you can do a safe power reset by cutting power briefly, then restoring it.
Will a dirty air filter stop the heat pump from starting?
A dirty filter mainly affects airflow and system efficiency; it can contribute to no-start if overheating protection triggers. Replace the filter and test again.
A clogged filter can cause no-start if the system overheats; replace it and retry.
Watch Video
Top Takeaways
- Check power first to rule out simple fixes
- Thermostat settings matter; ensure proper mode
- Ice, debris, or airflow restrictions are common culprits
- Safety and electrical hazards require professional help
- Regular maintenance prevents many no-start issues