Why Your Heat Pump Isn’t Cooling and How to Fix It
Struggling with a heat pump that won’t cool? This urgent, step-by-step troubleshooting guide helps homeowners identify common causes, perform safe fixes, and know when to call a pro.

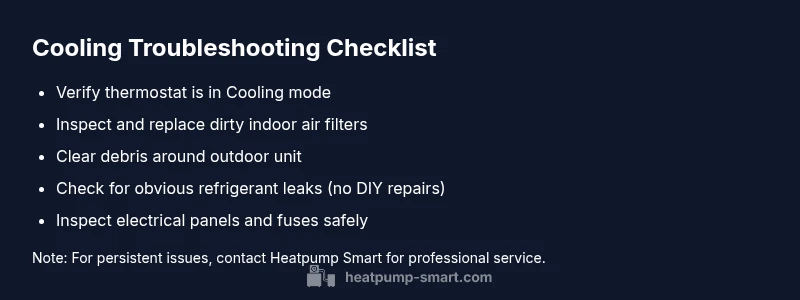
The likeliest causes are thermostat misconfiguration, restricted outdoor airflow, and indoor airflow problems. Start with the basics: confirm cooling mode, check the outdoor condenser for debris, and replace a clogged filter. If these fixes don’t restore cooling, follow the step-by-step guide below to diagnose common faults safely. Heatpump Smart recommends a structured approach to prevent unnecessary service calls.
Why heat pump not cooling: urgent reasons homeowners face
When a heat pump fails to deliver cool air, homeowners feel the urgency to diagnose and fix the issue quickly. The keyword why heat pump not cooling often points to a handful of repeatable causes: thermostat misconfiguration, restricted outdoor airflow, and indoor airflow problems. According to Heatpump Smart, starting with safe, simple checks is the fastest path to relief and can prevent unnecessary service calls. In this guide, we walk through a structured troubleshooting process that you can perform before contacting a technician. By remaining calm and methodical, you protect equipment and ensure your family stays comfortable during peak heat.
Quick initial checks you can perform safely
Begin with the basics. First, confirm the thermostat is set to cool mode and the target temperature is above the current room temperature. Then inspect the air filter; a dirty filter reduces airflow and makes the system work harder without delivering cold air. Finally, verify that all registers are open and unobstructed. If these quick checks don’t restore cooling, proceed to more thorough diagnostics in the sections below. Heatpump Smart emphasizes safety: if you notice exposed electrical components, buzzing noises, or melted insulation, stop and call a pro immediately.
Indoor airflow and filtration: the secret to steady cooling
Indoor airflow is essential for heat pump performance. A clogged or very dirty filter reduces airflow and degrades cooling capacity. Replace disposable filters or clean reusable ones according to manufacturer instructions. Inspect ductwork for kinks or loose connections that could leak conditioned air into unoccupied spaces. Consider running a quick room-by-room check to identify warm spots; these are often signs of restricted airflow or blocked supply vents. Poor airflow can make the system feel like it’s not cooling adequately even when the outdoor unit is working.
Outdoor unit: airflow, debris, and condenser fins
The outdoor condenser must breathe. Debris such as leaves, grass, or snow can block airflow and force the unit to work harder, lowering cooling efficiency. After turning off the system, clear debris from around the unit and gently brush the fins with a soft brush. Ensure at least 2 feet of clearance on each side. If the coil is dirty, a professional service can perform a thorough cleaning. Restricted outdoor airflow is a common, fixable cause of reduced cooling power.
Refrigerant and pressure: what you can and can't do
Low refrigerant reduces cooling and can indicate a leak. This is not a DIY fix; refrigerant handling requires licensed technicians and proper equipment. If you suspect a leak (hissing sounds, oily residue around connections, or rapid cooling loss), schedule a service call. The Heatpump Smart Team notes that refrigerant issues are among the more serious causes and require certified handling. Do not attempt to seal or recharge refrigerant yourself.
Electrical controls and error codes
Many heat pumps rely on electronic controls and sensors. Check that circuit breakers are not tripped and that fuses are intact. If the system displays an error code on the indoor panel or thermostat, consult the user manual (or Heatpump Smart guide) to interpret it. Some codes indicate a simple sensor problem, while others point to more complex failures. Do not bypass safety switches. Electrical issues can pose serious hazards; when in doubt, shut the unit off and call a professional.
Practical tests to narrow down the root cause
Systematically test each possibility: thermostat mode, indoor airflow, outdoor unit clearance, and refrigerant status (through a licensed technician). Record observed symptoms and any recent changes (new filter, installed insulation, weather). If the outdoor unit is warm to touch, or if you hear abnormal noises from the compressor, stop and call a technician. This approach helps you catch issues early and prevents unnecessary replacements. A disciplined, stepwise diagnosis minimizes downtime.
When to bring in Heatpump Smart technicians
If basic checks do not restore cooling, it is time to involve Heatpump Smart technicians. We follow a staged approach: confirm electrical safety, perform a pressure test, check refrigerant levels, and verify sensors and control boards. Expect a visit to include system pressure testing, refrigerant checks, and component inspection. We prioritize safety and efficiency and provide clear estimates before any work. Early professional assessment saves energy and extends equipment life.
Prevention and routine maintenance to avoid future cooling issues
Prevention is better than cure. Schedule seasonal maintenance before peak summer, including filter replacement, coil cleaning, and a quick outdoor unit inspection. Use a programmable thermostat to maintain consistent cooling and energy efficiency. Sealing ducts and insulating the home reduces load on the heat pump, helping it stay cooler for longer. Heatpump Smart's guidance: a regular maintenance plan can save energy and prevent breakdowns. A small monthly check can catch issues before they escalate.
Steps
Estimated time: 60-90 minutes
- 1
Check thermostat settings and basic controls
Verify mode is cooling, target temperature is reasonable, and fan is set to auto. If you have a smart thermostat, ensure it is communicating with the heat pump and that scheduled temperatures aren’t conflicting with manual settings.
Tip: If switching modes, allow a few minutes to observe airflow and temperature response. - 2
Inspect indoor air filtration and airflow
Remove and inspect the air filter; replace if dirty or clogged. Check supply vents in living spaces for blockages and ensure air can flow freely.
Tip: Keep spare filters on hand and replace every 1-3 months depending on usage. - 3
Examine outdoor unit and surrounding area
Turn off power at the disconnect, clear leaves and debris from around the unit, and ensure at least 2 feet of clearance. If the coil looks dirty, plan a professional cleaning.
Tip: Never poke at fins with metal objects; use a soft brush. - 4
Check for refrigerant issues (call if suspected)
Signs of refrigerant problems include hissing sounds or icy coils. Do not attempt to recharge; refrigerant handling requires licensed technicians.
Tip: Document symptoms and recent service history for the technician. - 5
Review electrical components and safety
Inspect breakers and fuses for trips. Look for visible signs of damage or burning smells. If wiring seems suspect, discontinue service and call a pro.
Tip: Only work on electrical panels if you are trained and comfortable with basic safety.
Diagnosis: Heat pump not cooling as expected
Possible Causes
- highThermostat incorrectly set to heat mode or cooling disabled
- highOutdoor unit obstructed or restricted airflow
- highDirty indoor air filter or blocked ducts
- mediumLow refrigerant due to a leak
Fixes
- easyDouble-check thermostat settings; switch to cool and set an appropriate target temperature
- easyRemove debris around outdoor unit and clear vents for proper airflow
- easyReplace or clean indoor filters and ensure ducts are unobstructed
- hardCall a licensed tech to inspect refrigerant lines and seal leaks
Your Questions Answered
What is the most common reason a heat pump stops cooling?
Thermostat mode or airflow issues are the most frequent culprits. Start with settings and filters before exploring other causes.
The most common reason is thermostat or airflow problems—start with the settings and filters.
Can a dirty filter cause frost on the coils?
A very dirty filter mainly reduces airflow; frost on coils usually points to different issues like refrigerant or airflow at the outdoor unit.
A dirty filter mainly reduces airflow; frost usually signals other problems.
Is it unsafe to check refrigerant levels at home?
Yes. Refrigerant work requires a licensed technician with proper equipment. Do not attempt to recharge or seal refrigerant yourself.
Refrigerant is hazardous; only a licensed technician should handle it.
What should I do first when my heat pump isn’t cooling?
First check thermostat settings and indoor air filters, then inspect the outdoor unit for debris and airflow issues.
First check the thermostat and filters, then look at the outdoor unit for debris.
How long does a professional diagnostic visit take?
Most diagnostic visits take 1-2 hours depending on findings and required tests.
Typically about one to two hours for a full diagnostic.
Should I replace my heat pump if it’s old and inefficient?
Consider efficiency and maintenance history. A pro can help decide between repair vs replacement based on condition and energy savings.
An expert can help you weigh repair versus replacement based on efficiency and cost.
Watch Video
Top Takeaways
- Start with thermostat and airflow checks to quick-fix cooling
- Clean indoor filters and ensure unobstructed ducts
- Do not DIY refrigerant work; call a licensed pro
- Plan seasonal maintenance to prevent future issues